June 7, 2017

Vamos à feira!!!

Todas as sextas feiras, a meio quarteirão de casa, comida fresca na feira. 

Carrinho cheio de maravilhas para a semana! 


Frutas, verduras, cebola, alho, garapa.... um pastel logo ali mesmo... coco ralado, pó para tapioca, temperos variados. Que festa! Boas memórias dessa feira!!


Empanadas - Allison

June 6, 2017

Fish Stew - Moqueca de Peixe (receita em inglês, da minha aula)

Brazilian Fish Stew
(Moqueca de Peixe)

Serves 6

First Part
  • 1 ½ lb sea bass, grouper or cod, cut into 6 pieces
  • 2 cloves of garlic
  • Salt to taste
  • Juice of one lemon
  • Leaves of ½ bunch of cilantro, coarsely chopped

Rinse the fish in fresh water and dry it. Press the garlic and add the salt and lemon. Rub this mixture on both sides of the fish. Spread the cilantro on top of the fish.
Prepare this part ahead of time to let the fish marinate for at least 4 to 5 hours. If you have time, do it the day before. In Portuguese you would say that you are letting the fish ‘moquecar’, which is the translation for ‘marinate’. Before using the fish to assemble the dish, scrape out the big chunks of garlic, which otherwise would give a strong flavor of raw garlic to the moqueca

Second Part
  • 2 table spoons of annatto oil or what is enough to cover the bottom of a French Oven or buffet casserole. Prepare annatto oil by simmering ¼ cup annatto seeds in ½ cup of good quality olive oil for ten minutes. Don’t let the oil boil! Strain and save
  • 18 slices of medium sized tomato or slices of 6 roma tomatoes. Peel and seed the tomatoes before slicing them
  • 18 thin slices of yellow or red onion
  • 18 thin slices of red or yellow bell pepper. Seed and core the pepper before cutting the thin slices
  • Salt to taste
  • ½ can of coconut milk
  • ½ bunch of cilantro leaves, coarsely chopped

Sauté the onions in the annatto oil until translucent, but not too soft. Add the tomato slices and cook until it loosens some of their extra moist if the tomatoes are too watery. If it’s meatier and they don’t have too much water, quickly sauté them. Salt to taste. Set it aside.
Arrange the remainder of the ingredients in layers following this order:
Olive oil to cover the bottom of a French Oven; marinated fish; slices of pepper decoratively distributed over the fish pieces; mixture of onions, tomatoes and annatto oil.
If you are multiplying this recipe, make a new layer on top of the first one. Don’t do more than two recipes in a pan. If you are making Moqueca for more than 12 people, start another recipe/s in another pan.
Cover the pan and let it ‘moquecar’ for some hours. You can let it marinating in the fridge for up to a day.

When it’s time to cook, put the pan on high heat until it starts to boil. Immediately lower the heat and let it cook for 10 minutes. Add the coconut milk on top of everything and cook for another 10 minutes. Use the cilantro to garnish.


(Angela Riberi and Elisa Lobo Neese version of the Moqueca de Peixe, Capixaba style. Capixaba refers to whoever is from the state of Espírito Santo, in Brasil)

This is the link to the video class showing how to make this dish, rice and farofa:


Ideas to enjoy the Panini Grill even more!

Veggies that go well in the grill:

Asparagus - mushrooms - zucchini - thin slices of eggplant - French beans - this slices of squash - thin slices of potatoes - onions - garlic with the peel - pepper - celery - mini corn - carrots - broccoli - cauliflower

Some veggies grill much faster than others. It would be a good idea to put them in the grill by groups according to their softness. For example: mushrooms and asparagus tips grill faster than the asparagus stem. Add them a few minutes later. If something is done much sooner than you had imagined, just return it to the grill for a couple of minutes with the remainder of the veggies before serving.

Spray olive oil or butter in your food, not on the grill

Desserts:

Grill banana in the peel until soft to the touch, which takes around 15 minutes. Then make a cut along the peel and take out the fruit. Sprinkle with cinnamon sugar and add a scoop of vanilla ice cream to have a superb dessert

Peaches, apples and pears (not too soft) grill really well. They call always be served with ice cream

French Toast works really well in the Panini grill too and you are avoiding extra fat intake

Sandwich ideas:

Squeeze garlic into some olive oil or butter. Spread over the bread (preferably ciabatta) and grill it. Assemble your sandwich with the garlic side inside of it.

Cheeses melt marvelously in the grill and kind of glue the bread together. If you want to add some fresh veggie later (arugula or tomato), you may just cut the sandwich to open it

Hamburger, chicken and fish sandwiches are great options also. You can marinate your meat or poultry or fish before grilling. You don't need to pat them dry, but it's good to let the excess of marinating drip before putting the food in the grill

Bacon turns out very nice also. It grills evenly because it’s kept flat with the weight of the lid


Other ingredients that are delicious in your Panini grill: pesto, smoked salmon, goat cheese, basil, artichoke hearts, roast beef, Portobello mushroom, prosciutto

Yogurte Caseiro

(em construção)


June 5, 2017

Æbleskiver - Susan

The recipe below is better if  more buttermilk is added in order to obtain a moister and softer batter. 


(fotos do Chad Gilliard fazendo Aebleskiver com 
maçã no Mill City Farmer's Market)

June 4, 2017

Two-minute chocolate cake in the mug - Mary Jean


Salpicão de Galinha - Mã

Peito de frango cozido com aromáticos  e desfiado

Nozes assadas e picadas

Salsão picado fininho

Erva doce cortada fininha 

Maçã verde em fatias bem finas 

Salsinha e cebolinha

Cebola picada fina

Ice Cream - Gary


MIxed Grain and Wild Rice Cereal - Mary Lou

Salted Caramel Chocolate Chip Cookies - Amy

Here is the recipe.  I got the original idea from a customer who was looking for chocolate chips.  When I asked her what she was making, she said, "salted caramel chocolate chip cookies".  This gave me the idea to modify the recipe I have been using for years for "regular" chocolate chip cookies.  I should tell you that the original recipe was developed after my son (at age 8 or 9) told us that my cookies were not as good as our neighbor's.  I was so wounded by his remark that I spent lots of time and effort figuring out what would top my neighbor's cookies.  I finally got it right after years of effort.  Now, maybe 10 years after the "perfected" recipe, I think I may have actually improved it.  Everybody who has tried it has given it a good review.  This is very exciting to me!  So, here it is.  I hope you enjoy it...

Salted Caramel Chocolate Chip Cookies

2 cups flour
1/2 tsp. baking powder
1/2 tsp. baking soda
1/2 tsp. salt
1 1/2 tsp. espresso powder
1/2 cup butter or margarine (I use Fleischman's unsalted margarine)
3 tbsp. granulated sugar
1 cup light brown sugar
1 large egg
2 tsp. vanilla extract
1 cup dark chocolate covered caramel candies, cut into small chunks (bought at Trader Joe’s)
1/3 cup semi-sweet chocolate chips

Preheat oven to 375 degrees.

In a small bowl, combine flour baking powder, baking soda, salt and espresso powder.  Set aside.
In bowl of stand mixer, cream butter, sugar and brown sugar.  Mix until well combined.
Add egg and vanilla.  Beat until creamy.
Gradually add in flour mixture until well combined.
Mix in caramels and chocolate chips.
Scoop (with cookie scooper) onto parchment-covered cookie sheet.  Bake for 11 minutes.
Remove from oven and let cool.  Caramel may ooze out sides of cookies while baking.  When cool, use sharp knife to separate cookies and cut off errant bits of caramel.

Theoretically, this recipe makes three dozen small cookies.  This has never really been proven, though.  It all depends how much dough actually makes it into the oven.
I usually get about two dozen cookies and a big sugar rush.

Enjoy!
Amy

Easiest and Best French Bread - Mark Bittman

Mark Bittman's Food Processor Baguettes

Sunday, December 27, 2009

I had no hope at all for this very simple recipe for baguettes. I don't even know what possessed me to try it, except that my daughter Elizabeth had asked me for a bread recipe that used a food processor, and my daughter Sarah had asked me for Bittman's How to Cook Everything as a Christmas present. When I was leafing through the new, improved version of the cookbook, I ran across the recipe for "Easiest and Best French Bread." Oh, right, I thought. Toss four simple ingredients into a food processor, and then, when you think of it, give them a little shaping and bake. I'm sure that's going to make a good baguette.

I don't know why, but this easy-as-pie recipe turned out a better baguette than the Peter Reinhart version I made a few weeks ago where I laboriously sieved whole wheat flour to try to approximate "clear flour." It's not at all fair that something this easy should turn out so good, but there you are. It's a recipe that you should try anytime you feel like turning out a flavorful baguette but you don't want to start the process three days ahead of time.

The recipe consists of flour, water, salt, and yeast. Everything goes in a food processor for about 30 seconds. You gather up the dough--it's pretty wet--put it in a bowl and let it rise for a few hours.

Shape it into three loaves and put them into a French bread pan.

Let them rise again, slash them, and put them in the oven.

Take them out a half-hour later.

That's it! I don't know why one of the loaves looks so much more decorous than the other two--I guess the slashes weren't as deep.

I liked the way they looked when they came out of the oven. I liked the way they smelled. But I'd liked the way the poolish baguettes of a few weeks ago looked and smelled too, and then I was disappointed when I tasted them. But these tasted really good--so much better than I expected. I've considered the possibility that it was just my low expectations that made me so impressed with the way these loaves turned out. Since I expected nothing, any result above nothing would be good. But I don't think so. The outside is crusty but not hard, the inside is chewy and full of rich flavor. If I bought it at a bakery, I'd go back for more.
Everyone knows Mark Bittman is the one who popularized no-knead bread, the craze of a few years ago. But maybe it's this food processor baguette that really deserves the popularity.

Easiest and Best French Bread

--from How to Cook Everything, by Mark Bittman

3 1/2 cups (546 grams) bread flour
2 tsp. salt
1 tsp. instant yeast
1 1/2 cups water (or more)

1. Process flour, salt, and yeast for a few seconds in food processor, using the metal blade. With the machine running, pour most of the water through the feed tube. Process about 30 seconds, or until dough becomes a sticky, shaggy ball. If it doesn't feel sticky, add more water.

2. Turn dough into large bowl, and cover with plastic wrap. Let rise for two to three hours at room temperature.

3. Sprinkle a little flour on the counter, and cut dough into three equal pieces. Shape each into long roll, and place in a lightly floured baguette pan. Cover with a towel, and let rise for another one to two hours. (On a cold day, you'll need the full rising time).

4. About a half-hour before baking, put baking stone in oven, and skillet or pan on lowest shelf. Preheat oven to 450 degrees. When ready to bake, slash loaves with sharp knife and sprinkle lightly with flour. Put about 1/2 cup of ice cubes on pan on lowest shelf of the oven, and quickly put baguette pan on top of baking stone.

5. Spray sides of oven after five minutes and again after ten minutes.

6. Bake 25 to 35 minutes, until crust is golden brown. Cool on a wire rack.

http://breadbasketcase.blogspot.com/2009/12/mark-bittmans-food-processor-baguettes.html

Ají de Gallina - inspiração do Marco e Cássia

Aji de Gallina (Chicken in a Spicy Sauce)
10 Reviews
Yield:4 to 6 servings

Ingredients
1 large frying chicken (about 3 1/2 4 pounds)
1 leek, trimmed, washed and chopped
1 medium onion, peeled and chopped
1 medium carrot, peeled and chopped
1 tomato, chopped
2 teaspoons coarse salt
1 tablespoon peppercorns
2 bay leaves
2 cups soft bread crumbs
1 cup milk
1/2 cup olive oil
2 onions, finely chopped
2 cloves garlic, minced
1 teaspoon ground cumin
1 tablespoon yellow Aji, Amarillo or Chile powder
1/3 cup finely chopped or ground walnuts
1 cup grated Parmesan cheese
2 pounds small potatoes, boiled, peeled and halved
4 hard-boiled eggs, halved
Chopped parsley for garnish


Directions
Place chicken in a large pot and fill with water to halfway up sides of bird. Add leek, onion, carrot, tomato, salt, peppercorns and bay leaves. Cover, bring to a boil, reduce the heat and simmer for 45 minutes, or until chicken is done. Remove chicken and place in a bowl until cool enough to remove the meat from the bones and shred into bitesize pieces. Meanwhile, strain broth and reserve 4 cups.

Soak the bread in the milk. Heat oil in a large skillet over medium heat. Add the onions and saute until soft and golden, about 10 minutes. Add the garlic and cumin and saute for 1 more minute. Add softened bread and aji or chile powder, and cook for about 1 minute, stirring. (For a creamier sauce, place onion-bread mixture in a blender, puree until smooth and return to skillet.) Add 2 cups of the chicken stock and continue cooking until sauce thickens and coats the back of a spoon, about 5 minutes.

Add the chicken and simmer for 5 to 8 more minutes, adding more stock if needed. Stir in the walnuts and Parmesan cheese, and simmer gently for another 5 minutes, or until thickened slightly. To serve, spoon chicken and sauce onto a serving platter and surround with potatoes and eggs. Sprinkle with chopped parsley.

c.1997, M.S. Milliken & S. Feniger, all rights reserved

Read more at: http://www.foodnetwork.com/recipes/aji-de-gallina-chicken-in-a-spicy-sauce-recipe.html?oc=linkback

Carne Louca - Gê

Para 1,5 kg de lagarto, colocar na panela de pressao 1 copo (250 ml) de oleo, 3/4 copo de vinagre e 2 copos de agua.   

Com uma faca de ponta fina furar a carne em varios pontos e colocar nos furos um pouco de sal e pimenta do reino.  

Amarrar a carne com linha, de maneira que ela nao encolha muito quando cozinhar, e coloca-la na panela deixando cozinhar na pressao por uma hora.   

Depois de cozida, retirar a carne e coloca-la na geladeira.   

Se houver ainda muita agua na panela, deixar ferver um pouco para reduzir.   Adicionar na mesma panela bastante cebola picada em rodelas,  azeitonas verdes picadas e uma ou duas folhas de louro.   Deixar cozinhar um pouco, se necessario adicionar mais um pouco de oleo e sal.   A cebola nao deve ficar cozida demais ou muito mole.   

Retirar o barbante da carne e corta-la em fatias bem finas, se quiser com faca eletrica, e em uma forma ou travessa alternar camadas de carne e molho de cebola, e colocar na geladeira.   O sabor acentua de um dia para o outro.  

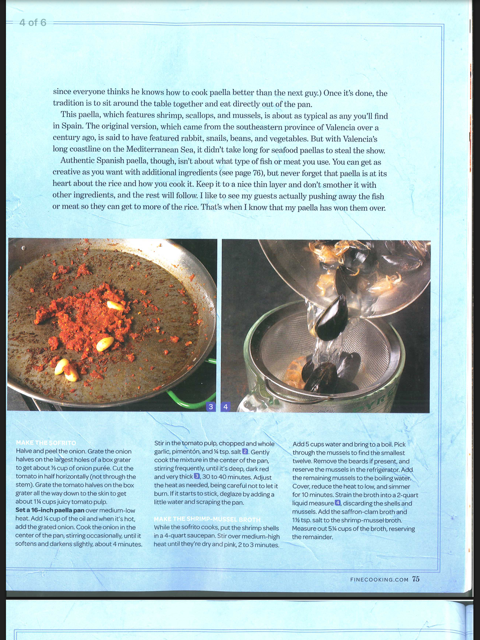
Authentic Paella

Italian Strata - Tammy

Parmesan-Crumbed Chicken by Elizabeth Terry (Fine Cooking)

Parmesan-Crumbed Chicken


A simple Parmesan and breadcrumb mixture gives these breasts a crunchy coating and keeps them moist inside.
For the chicken:
  • 6 boneless, skinless chicken breast halves (about 6 oz. each)
  • 6 tsp. Dijon-style mustard (or less)
  • 1 Tbs. white wine or water
  • 3/4 tsp. salt
  • 1/4 tsp. freshly ground black pepper
For the coating:
  • 1 cup freshly grated Parmesan
  • 1 cup fresh English muffin (or sandwich bread) crumbs
  • Freshly ground black pepper
  • 4 Tbs. melted butter
For the chicken: Rinse the breasts and pat them dry. In a shallow bowl, whisk together
the mustard, wine, salt, and pepper and add the chicken. The chicken can be coated
immediately or held in the refrigerator for up to 2 hours.
For the coating: In a large, shallow dish, mix the cheese, breadcrumbs, and pepper.
Drizzle the melted butter over the crumb mixture and toss until well combined.
To coat and cook the chicken: Heat the oven to 450°F and butter a baking sheet or rack.
Take a breast from the marinade with one hand--this is now your "wet" hand.
Don't wipe off the marinade. Lay the chicken on the crumbs. Scoop and pat the crumbs
over the breast using your other hand (your "dry" hand), patting until both sides are
thoroughly coated. Put the breast on a buttered baking sheet or rack and repeat with
the remaining breasts. Roast the chicken until it's crisp, browned, and cooked through, 25
 to 30 minutes. Check after 15 minutes. If the chicken is getting too brown, reduce the heat
 to 400° and add 5 minutes to the total cooking time.
nutrition information (per serving):
Calories (kcal): 360; Fat (g): fat g 18; Fat Calories (kcal): 160; Saturated Fat (g): sat fat g 9;
Protein (g):protein g 43; Monounsaturated Fat (g): 6; Carbohydrates (g): carbs g 6;
Polyunsaturated Fat (g): 1; Sodium (mg): sodium mg 990; Cholesterol (mg):
cholesterol mg 130; Fiber (g): fiber g 1;
PHOTO: BEN FINK


by guadalupe, 3/20/2014 Easy and delicious. Keep an eye on it. I had to reduce to 400
degress after 10 minutes since it was browning too much.

by KITKAT_1959, 10/16/2013 Delicious and so simple! Only change I made was using
extra butter and crumbs. Decadent yes but oh so good.
by tscholl, 12/16/2011 Everyone loves this recipe, including my chef-partner who requests
it frequently. (He prefers it with chicken thighs, rather than breasts.) Either way, it's a
fool-proof, wonderful recipe!
by GreenBird, 10/14/2011 Delicious, quick, and easy, a wonderful combination.
I have made this chicken numerous times, and it won accolades each time.
by Islandermom, 8/23/2011 Superb! I cooked it on a rack, at 425 convect, 18-20
minutes and it crisped up perfectly - the family loved it!
by Kimmy95, 12/27/2010 I found the dijon tang just a little too much...and I love dijon.
Maybe a little less dijon and a little more cheese...perhaps a stronger one to help
off set the dijon.
by luvsfood, 2/17/2010 This was a very good recipe that kept my family wanting more.
It's best to let the chicken site with the marinade, so it won't be dry.
by Sammysam, 2/11/2010 A fabulous, easy, yet tasty recipe. It never disappoints.
The chicken is moist and tender and the flavors imparted by the bread and cheese
mixture rival that of a five star restaurant.
by atriola702, 6/11/2009 I have made this once a month for the past year.
My all time favorite baked chicken breast recipe.
by Coggan, 2/7/2008 This is one of my staples. I've made it at least once a month
for several years. Be sure to use a good quality parmesan.
    

http://www.finecooking.com/recipes/parmesan_crumbed_chicken.aspx

Thomas Keller's Roast Chicken

My Favorite Simple Roast Chicken
October 2004
by Thomas Keller

Ingredients
  • One 2- to 3-pound farm-raised chicken
  • Kosher salt and freshly ground black pepper
  • 2 teaspoons minced thyme (optional)
  • Unsalted butter
  • Dijon mustard

Preparation
Preheat the oven to 450°F. Rinse the chicken, then dry it very well with paper towels, inside and out. The less it steams, the drier the heat, the better.
Salt and pepper the cavity, then truss the bird. Trussing is not difficult, and if you roast chicken often, it's a good technique to feel comfortable with. When you truss a bird, the wings and legs stay close to the body; the ends of the drumsticks cover the top of the breast and keep it from drying out. Trussing helps the chicken to cook evenly, and it also makes for a more beautiful roasted bird.
Now, salt the chicken—I like to rain the salt over the bird so that it has a nice uniform coating that will result in a crisp, salty, flavorful skin (about 1 tablespoon). When it's cooked, you should still be able to make out the salt baked onto the crisp skin. Season to taste with pepper.
Place the chicken in a sauté pan or roasting pan and, when the oven is up to temperature, put the chicken in the oven. I leave it alone—I don't baste it, I don't add butter; you can if you wish, but I feel this creates steam, which I don't want. Roast it until it's done, 50 to 60 minutes. Remove it from the oven and add the thyme, if using, to the pan. Baste the chicken with the juices and thyme and let it rest for 15 minutes on a cutting board.
Remove the twine. Separate the middle wing joint and eat that immediately. Remove the legs and thighs. I like to take off the backbone and eat one of the oysters, the two succulent morsels of meat embedded here, and give the other to the person I'm cooking with. But I take the chicken butt for myself. I could never understand why my brothers always fought over that triangular tip—until one day I got the crispy, juicy fat myself. These are the cook's rewards. Cut the breast down the middle and serve it on the bone, with one wing joint still attached to each. The preparation is not meant to be superelegant. Slather the meat with fresh butter. Serve with mustard on the side and, if you wish, a simple green salad. You'll start using a knife and fork, but finish with your fingers, because it's so good.


Sorvete de Morango (Strawberry Sorbet)

Por a cuba da máquina de fazer sorvete no freezer pelo menos 24 horas antes de fazer o sorvete.

Ingredientes:
½ xícara de açúcar

¼ xícara de água

2 xícaras de morango batido (mais ou menos 4 xícaras de morangos inteiros para obter o purê)

1 clara de ovo

Modo de Preparo:

Juntar a água e o açúcar e aquecer até que ele dissolva. Deixar esfriar. Juntas o purê de morango e levar à geladeira por pelo menos duas horas. Essa mistura também pode ser congelada e depois transferida de volta para a geladeira por algumas horas para degelar. 

Transferir a mistura para a cuba da máquina de fazer sorvete. Bater por 15 minutos. Acrescentar a clara de ovo e deixar bater por outros 15 minutos

É uma delícia logo que fica pronto com sua textura aveludada e bem aerada. 


Lemon Buttermilk Sherbet - Tammy

Lemon-Buttermilk Sherbet

Makes about 1 quart

⅓ cup water
⅔ cup sugar
1 medium lemon
2 cups buttermilk (don't add any more than it as the sherbet will be runny)
¼ cup freshly squeezed lemon juice

In a medium, nonreactive saucepan, mix the water and sugar.  Grate the zest of the lemon directly into the saucepan.   Heat, stirring frequently, until the sugar is dissolved.  Remove from the heat and let stand until the syrup reaches room temperature, then chill thoroughly in the refrigerator.

Whisk the buttermilk into the syrup, then whisk in the lemon juice.  Freeze in your ice cream maker according to the manufacturer's instructions.

--From The Perfect Scoop, David Lebovitz, Ten Speed Press, 2007


Blueberry muffins - Andrew Zimmern

Testar usar menos que 2 xícaras de farinha para ficar mais úmido e macio


May 31, 2017

Vitamina de manga e laranja

Uma das vitaminas preferidas! Aprendemos sobre ela no clube Pinheiros. Ao contrário da receita original de lá, não uso gelo. Com isso a vitamina tem uma textura cremosa e não fica aguada. Para que a vitamina seja gelada e refrescante, guardo as frutas na geladeira até a hora de prepará-la. Também não uso açúcar já que as duas frutas são naturalmente adocicadas. 

Uso a/as laranjas cortada/s em pedaços pequenos ao invés 
de espremê-la/s. As membranas dos segmentos acrescentam mais fibras à vitamina beneficiando o processo digestivo. 

Preparar a vitamina bem na hora de toma-la já que a alta volatilidade da vitamina C faz com que ela perca sua intensidade em apenas alguns minutos. Isso acontece porque quando exposta ao ar e luz, a vitamina C reage com o oxigênio resultando num processo de oxidação

 ~ ~ ~ ~ ~ ~ ~ ~ ~ ~ ~ ~ ~ ~ ~ 

- Uma laranja grande ou duas laranjas médias gelada/s sem casca ou sementes e cortada/s em pedaços pequenos
- 1/3 de xícara de manga gelada, picada
- 1/4 de colher de chá de baunilha pura

Bater tudo.
Que delícia!!!


Esse é o belo cristal de ácido ascórbico ou mais comumente conhecido como vitamina C:


Ou seja, tomar essa vitamina é um deleite para todos os sentidos!!!